Posts

Showing posts from April, 2020

Point of sale in TallyPrime

Image
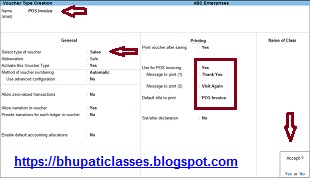
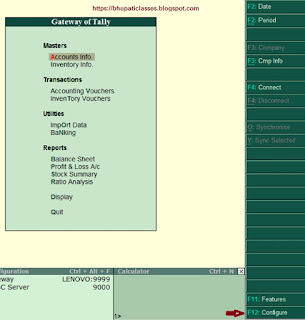
Point of sale in TallyPrime Point of sale in TallyPrime पोस्ट में हम जानेंगे कि Point of sale (POS) क्या है। Point of sale के advantages क्या हैं, POS invoice को टैली प्राइम में रिकॉर्ड कैसे करते हैं और payment के multiple mode में POS invoice को कैसे रिकॉर्ड करते हैं। Point of sale एक बिलिंग प्रक्रिया है। रिटेल शॉप में use होने वाले अलग अलग POS है जैसे cash register, card reader, bar-code scanner etc. POS invoice को single या multiple payment modes में रिकॉर्ड किया जा सकता है। टैली प्राइम में POS को प्रिन्ट कर सकते हैं। रिपोर्ट में POS के लेनदेन की list देख सकते हैं। टैली प्राइम में configure में POS को activate करना होता है। Point of sale के advantage - Sale को calculate करने में मदद मिलती है। Cash को manage करने में मदद मिलती है। Inventory को manage करने में मदद मिलती है। Bar-code scan करने में मदद मिलती है। Inventory और sales database की query को लचीला और सरल तरीका प्रदान करने में मदद मिलती है। Product movement को track करने में मदद मिलती है। Sale date और time को track करने और rec

How to Create Alter and Delete Ledgers in Tally.erp9 in Hindi

Image
Create Alter and Delete Ledgers in Tally.erp9 How to Create, Alter and Delete Ledgers in Tally.ERP9 in Hindi  post में बताया गया है कि Tally.ERP9 में Ledgers कैसे Create करेंगे और ledgers को Alter & Delete कैसे करते हैं यह भी  explain किया है। बिना ledger बनाए tally.erp9 में कोई भी transaction record नहीं हो सकता है। Ledger बनाने के बाद ही आप कोई entry कर सकते हैं।  Tally.erp9 में पहले से दो ledger बने हुए होते हैं। Cash  Profit & loss a/c  Cash का ledger under cash in hand और profit & loss a/c का ledger under primary बनता है। दोनों ही ledgers में opening balance enter कर सकते हैं।  Cash के ledger को delete कर सकते हैं।  Profit & loss a/c ledger को delete नहीं कर सकते हैं। Create ledger:- Gateway of tally - (enter) - Accounts Info - (enter) - ledgers - (enter) - create (single ledger) अब ledger creation window open होगी। Name:- Name enter करना है। Duplicate name allowed नहीं है। अगर duplicate name enter करेंगे तो error show होगा

How to Activate / Enable GST in Tally.erp9 in Hindi

Image
Activate / Enable GST in Tally.erp9 Activate / Enable GST in tally.erp9 post में GST को tally.erp9 में activate / enable करना और GST की detail को भरना बताया है।  Tally.erp9 GST को activate/enable करने के लिए Gateway of tally - F11 keypress करेंगे या F11: features enter करेंगे। Company features screen पर F3 keypress करेंगे या statutory & taxation पर enter करेंगे। Enable goods and services tax (GST) -YES (enter करेंगे) Set/alter GST details - YES (enter करेंगे)  अब GST details की screen open होगी।  यहाँ GST की details को update करना है। State :- company बनाते हुए आपने जो state enter किया है वह यहाँ automatic आ जायेगा।  Registration type :- composition or regular choose करना है।  GST applicable from :- transactions GST कब से applicable है वह date enter करनी है।  GSTIN / UIN :- company का goods and service tax India number (GSTIN) fill करना है। Periodicity of GSTR 1 :- monthly or quarterly period choose करना है company की requirements के अनुस

Tally.ERP 9 - Tally Screen Components in Hindi

Image
Tally Screen Components Components of Tally Screen - Tally.ERP9 - Hindi post में हम टैली स्क्रीन के components के बारे में जानेंगे। टैली स्टार्ट करने पर गेटवे ऑफ़ टैली स्क्रीन पर जो components हैं वह किस काम आते हैं यह जानेंगे। Tally.erp 9 software download & install करने के बाद tally.erp 9 को start करने पर  screen display होती है वह इस प्रकार है :- Tally screen components इस प्रकार हैं :- Title bar Horizontal button bar Close button Task bar Gateway of tally Info panel Calculation area Buttons toolbar 1. Title bar:- Tally screen components के title bar में tally software का कौनसा कौनसा version है वह show होता है। 2. Horizontal button bar:- Tally screen components के horizontal button bar में language, keyboard settings, control center, support center और help को select करने के option होते हैं। 3. Close button:- Tally screen components के close button में close button पर click करने या Ctrl + M press करने पर tally window बंद हो जाती है।

Tally.ERP 9 - F12 - Configuration in Hindi

Image
Tally.ERP 9 F12 - Configuration Tally.ERP9 - F12 - Configuration in Hindi post में F-12 - Configuration के बारे में बताया है। F12 - configuration option का use करके टैली में अपनी  आवश्यकता के अनुसार changes कर सकते हैं। Tally.ERP 9 F12 - configuration में आप अपने आवश्यकता के अनुसार changes कर सकते हो।  आप Tally.ERP 9 F12 - configuration में country detail, name and date style और बहुत सी details को configure कर सकते हो।  Tally.ERP 9 F12 - configuration में आप किसी एक कंपनी के लिए F12 में configuration करते हो तो Tally.ERP 9 में बनी हुई दूसरी companies के configuration को भी इफ़ेक्ट करेगा।  आप एक कंपनी में कुछ configure करते हो तो दूसरी companies में भी same changes हो जाते हैं।  Tally.ERP 9 F12 - configuration में बहुत सी settings होती हैं। यह settings आपको voucher entry, master creation, printing, banking आदि में जानकारी को configure करने में मदद करते हैं।  Open F12 - configuration in Tally.ERP 9 Tally.ERP 9 F12 - configuration open करने के लिए :- Gateway of Tally scree

How to Create, Display & Alter Group in Tally.ERP9 in Hindi

Image
What are groups and how to create a group in tally? How to Create, Display & Alter Group in Tally.ERP9 in Hindi post में बताया है की tally.erp9 में ग्रुप कैसे क्रिएट करते हैं। बने हुए ग्रुप को देखने के लिए display ऑप्शन का use करना बताया है। ग्रुप में कुछ changes करने है तो alter ऑप्शन का use करके changes कर सकते हैं यह भी बताया है। एक ही nature के खातों (ledgers) के संग्रह को Group कहते हैं। Tally software में पहले से ही 28 groups होते हैं। इनमें से 15 groups primary groups और 13 groups sub - groups होते हैं। Sub - Groups वह होते हैं जो primary groups के under बनते हैं। जैसे:- Current  Assets primary group है। Current Assets के under जो group बनते हैं उसको sub group कहते हैं। Current Assets के under बनने वाले sub-groups:- 1. Cash in hand 2. Bank Accounts 3. Sundry Debtors 4. Stock in hand.   Tally Software में पहले से जो primary groups होते हैं उनको delete नहीं कर सकते हैं। Primary Groups in Tally:- 1. Capital Accounts 2. Sales Accounts 3. Purchase Accounts 4. B