Point of sale in TallyPrime
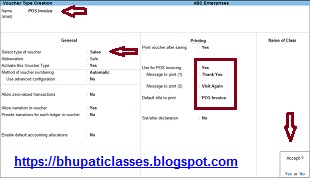
Image
Point of sale in TallyPrime Point of sale in TallyPrime पोस्ट में हम जानेंगे कि Point of sale (POS) क्या है। Point of sale के advantages क्या हैं, POS invoice को टैली प्राइम में रिकॉर्ड कैसे करते हैं और payment के multiple mode में POS invoice को कैसे रिकॉर्ड करते हैं। Point of sale एक बिलिंग प्रक्रिया है। रिटेल शॉप में use होने वाले अलग अलग POS है जैसे cash register, card reader, bar-code scanner etc. POS invoice को single या multiple payment modes में रिकॉर्ड किया जा सकता है। टैली प्राइम में POS को प्रिन्ट कर सकते हैं। रिपोर्ट में POS के लेनदेन की list देख सकते हैं। टैली प्राइम में configure में POS को activate करना होता है। Point of sale के advantage - Sale को calculate करने में मदद मिलती है। Cash को manage करने में मदद मिलती है। Inventory को manage करने में मदद मिलती है। Bar-code scan करने में मदद मिलती है। Inventory और sales database की query को लचीला और सरल तरीका प्रदान करने में मदद मिलती है। Product movement को track करने में मदद मिलती है। Sale date और time को track करने और...

How to Activate / Enable GST in Tally.erp9 in Hindi


Activate / Enable GST in Tally.erp9

Activate / Enable GST in tally.erp9 post में GST को tally.erp9 में activate / enable करना और GST की detail को भरना बताया है। 

Tally.erp9 GST को activate/enable करने के लिए Gateway of tally - F11 keypress करेंगे या F11: features enter करेंगे।


How to Activate / Enable GST in Tally.erp9


Company features screen पर F3 keypress करेंगे या statutory & taxation पर enter करेंगे।


How to Activate / Enable GST in Tally.erp9

Enable goods and services tax (GST) -YES (enter करेंगे)
Set/alter GST details - YES (enter करेंगे)


How to Activate / Enable GST in Tally.erp9


 अब GST details की screen open होगी।  यहाँ GST की details को update करना है।


How to Activate / Enable GST in Tally.erp9

  • State :- company बनाते हुए आपने जो state enter किया है वह यहाँ automatic आ जायेगा। 
  • Registration type:- composition or regular choose करना है। 
  • GST applicable from :- transactions GST कब से applicable है वह date enter करनी है। 
  • GSTIN / UIN:- company का goods and service tax India number (GSTIN) fill करना है।
  • Periodicity of GSTR 1:- monthly or quarterly period choose करना है company की requirements के अनुसार।
  • E - way bill applicable:- choose option YES
  1. applicable from :- e-way billजब से applicable है वह date enterकरे। 
  2. threshold limit:- invoice value
  3. Threshold limit:- enter allowed limit amount.
  4. Applicable for intrastate:- choose option YES
  5. Threshold limit:- enter allowed limit for intrastate
  • Enable tax liability on advance receipts:- choose YES or NO
  • Enable tax liability on advance on reverse charge:- choose YES or NO
  • Set/alter GST rate details:- choose YES or NO और detail fill करें।
  • Enable GST classification:- choose YES or NO
  • Provide lut / bond detail:- choose YES or NO और detail fill करें।
GST details भरने के बाद save करे। Save करने के लिए YES or Ctrl + A press करें।

इस प्रकार आप Tally.erp9 में GST activate / enable कर सकते हैं।

यह पोस्ट भी देखें

Comments

Popular posts from this blog

Backup & Restore Company Data in TallyPrime

How to Create Stock Groups in Tally.ERP9 in Hindi

GST - Notification - Central Board of Indirect Taxes and Customs - 05.05.2020