Posts

Showing posts from 2020

Point of sale in TallyPrime
Image
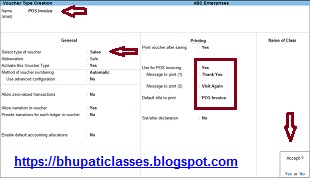
Point of sale in TallyPrime Point of sale in TallyPrime पोस्ट में हम जानेंगे कि Point of sale (POS) क्या है। Point of sale के advantages क्या हैं, POS invoice को टैली प्राइम में रिकॉर्ड कैसे करते हैं और payment के multiple mode में POS invoice को कैसे रिकॉर्ड करते हैं। Point of sale एक बिलिंग प्रक्रिया है। रिटेल शॉप में use होने वाले अलग अलग POS है जैसे cash register, card reader, bar-code scanner etc. POS invoice को single या multiple payment modes में रिकॉर्ड किया जा सकता है। टैली प्राइम में POS को प्रिन्ट कर सकते हैं। रिपोर्ट में POS के लेनदेन की list देख सकते हैं। टैली प्राइम में configure में POS को activate करना होता है। Point of sale के advantage - Sale को calculate करने में मदद मिलती है। Cash को manage करने में मदद मिलती है। Inventory को manage करने में मदद मिलती है। Bar-code scan करने में मदद मिलती है। Inventory और sales database की query को लचीला और सरल तरीका प्रदान करने में मदद मिलती है। Product movement को track करने में मदद मिलती है। Sale date और time को track करने और...

TallyPrime - Shortcut Keys - Learn Tally

TallyPrime - Shortcut Keys  In TallyPrime - Shortcut Keys -Learn Tally post, we will know what are the shortcut keys in TallyPrime. By using Shortcut Keys, we can do the work quickly and easily. Some shortcut keys used in TallyPrime are as follows - TallyPrime Shortcut Keys Alt + I = To insert voucher. Alt + 2 = To create an entry by duplication a voucher alt + D = To delete an entry. Alt + A = To add a voucher. Ctrl + R = To remove an entry. Alt + T = To hide or show details. Alt + U = To display all hidden entries line which was removed. Ctrl + U = To display the Last hidden entry line which was removed. Ctrl + Enter = To alter the master while entering the voucher. Alt + F1 = To view an report in Detail. Alt + F5 = To view an report in condensed format. Space bar = To select the line in the report. Shift + Spacebar = To deselect the line in the report. Ctrl + Spacebar = To select all the lines in the report. Shift + up/down = To select multiple lines in a report. F4 = To open Co...

TallyPrime - Shortcut Keys in Hindi

Image
TallyPrime Shortcut Keys  TallyPrime - Shortcut Keys in Hindi post, में हम जानेंगे कि TallyPrime में shortcut keys कौन कौन सी हैं। Shortcut Keys का use करके हम काम को जल्दी और आसान तरीके से कर सकते हैं। TallyPrime में use होने वाली कुछ Shortcut Keys इस प्रकार हैं - TallyPrime Shortcut Keys Alt + I = Voucher insert करने के लिये . Alt + 2 = Duplicate voucher करके entry करने के लिये . Alt + D = Entry को delete करने के लिये . Alt + A = Voucher add करने के लिये . Ctrl + R = Entry को remove करने के लिये . Alt + T = Details को hide या show करने के लिये . Alt + U = सभी छिपी हुई entries line जिसको हटा दिया गया था देखने (display) के लिये . Ctrl + U = Last छिपी हुई entry line जिसको हटा दिया गाया था देख्नने (display) के लिये . Ctrl + Enter = Voucher entry करते समय master alter करने के लिये . Alt + F1 = Detail में report देखने के लिये . Alt + F5 = Condensed format में report को देखने के लिये . Spa...

TallyPrime - Create, Alter, Select and Shut Company - Learn Tally

Image
Create, Alter, Select, and Shut Company  In TallyPrime - Create, Alter, Select and Shut Company - Learn Tally post, we'll see the way to create a company in TallyPrime and if you would like to some changes within the created company, then we'll see the way to Alter. We will also see the select and shut option for the company. In TallyPrime's Educational mode, we'll learn to company Create, Alter, Select and Shut option. Click on the link below to see the way to download and install TallyPrime. TallyPrime - Download / Install and Create Company Create Company The Educational version of TallyPrime is free. Install the educational version of TallyPrime and click on the icon. The window will open. To work on the tutorial version, click on Continue in educational mode. The shortcut key (T) also can be pressed. The window will open. We will click on Create Company. The Company creation window will open. Company information to be filled in the company creation window Company d...

TallyPrime - Create, Alter, Select and Shut Company in Hindi

Image
Create, Alter, Select, and Shut Company    TallyPrime - Create, Alter, Select and Shut Company in Hindi post में हम TallyPrime में Company कैसे Create करतें हैं वह देखेंगे और बनी हुई comapny में कुछ changes करने हैं तो कैसे Alter करते हैं वह देखेंगे साथ ही company Select और shut करना भी देखेंगे। TallyPrime के Educational mode में हम company Create, Alter, Select and Shut करना सीखेंगे। TallyPrime को कैसे download और Install करते हैं यह देखने के लिए नीचे दिए गए link पर click करें। How to Download & Install TallyPrime and Create Company in Hindi Create Company TallyPrime का Educational version free है। TallyPrime के educational version को install करके icon पर click करने पर window open होगी।  Educational version पर काम करने के लिये Continue in educational mode पर click करेंगे। (T) shortcut key भी press कर सकते हैं। Window open होगी।  Create company पर click करेंगे। Company creation window open होगी।  Company creation window में...

TallyPrime - Top Features in Hindi

TallyPrime Features  TallyPrime - Top Features in Hindi post में TallyPrime के Features के बारे में बताया है। TallyPrime एक नया business management  software है, TallyPrime के साथ आप एक नए स्तर का अनुभव करेंगें। TallyPrime समझने के लिए लचीला है। आप अपने business को जैसा चाहते हो वैसा manage कर सकते हो। TallyPrime आपको वह तरीका देता है जिससे आप business का management कर सकते हैं और reports देख सकते हैं। TallyPrime software का use करना आसान है। businessman TallyPrime के साथ comfortable होंगें। business के विकास के लिए निर्णय लेने में TallyPrime में reports सहायक होती हैं। TallyPrime के माध्यम से business की दक्षता और अन्य कई चीज़ो को बढ़ाना संभव है। TallyPrime  - Top Features  TallyPrime के साथ शुरुआत करना बेहद आसान है। आप कुछ ही मिनटों में application सेट कर सकते हैं और तेज़ी से invoicing शुरू कर सकते हैं। TallyPrime में 400 से ज़्यादा business reports देख सकते हैं। Reports को देखना आसान हैं। reports के जरिए आप अपने business को बढ़ाने का निर्णय ले सकते हैं। TallyPrime...

TallyPrime - Download / Install and Create Company

Image
Download / Install & Create Company in TallyPrime   TallyPrime - Download / Install and Create Company, in this post, we will see how to download TallyPrime from www.tallysolution.com and then how to install TallyPrime from the setup file. We will also see how to create a company in TallyPrime. TallyPrime software is launched on 09/11/2020. TallyPrime software can be used both by educational and license. We used to update any release of Tally ERP9 with our software, but TallyPrime is new software, after downloading its setup file we will use it. The path, folder of Tally ERP9 and TallyPrime should be kept separate. So that you can use both TallyPrime and Tally ERP9. By using TallyPrime separately. You will understand all the functions very well. Download TallyPrime - To Download the TallyPrime setup file, go to www.tallysolutions/download web page and click on download. Select the folder in which to save TallyPrime's setup file and then click on save. The setup file will be sa...

How to Download & Install TallyPrime and Create Company in Hindi

Image
Download & Install TallyPrime and Create Company  How to Download & Install TallyPrime and Create Company post में हम देखेंगे कि www.tallysolution.com से TallyPrime को कैसे download करते हैं और उसके बाद setup file से TallyPrime को install कैसे करते हैं। TallyPrime में Company Create कैसे करते हैं यह भी देखेंगे। 09/11/2020 को TallyPrime software launch हुआ है। TallyPrime को educational और license दोनों ही तरह से use कर सकते हैं। Tally ERP9  के किसी भी release को अपने software से update करते थे लेकिन TallyPrime एक new software है इसकी setup file download करने के बाद use करेंगे। Tally ERP9 और TallyPrime के path, folder को अलग अलग रखना चाहिये। जिससे कि आप TallyPrime को use करके सभी functions को अच्छी तरह से समझ सकें। Download TallyPrime setup file - TallyPrime setup file download करने के लिए www.tallysolutions/download web page पर जाकर download पर click करेंगे। TallyPrime की setup file जिस folder में save करना है वह...