Point of sale in TallyPrime

Image
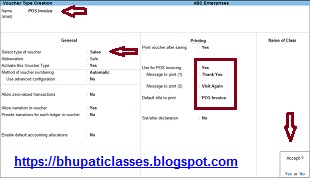
Point of sale in TallyPrime Point of sale in TallyPrime पोस्ट में हम जानेंगे कि Point of sale (POS) क्या है। Point of sale के advantages क्या हैं, POS invoice को टैली प्राइम में रिकॉर्ड कैसे करते हैं और payment के multiple mode में POS invoice को कैसे रिकॉर्ड करते हैं। Point of sale एक बिलिंग प्रक्रिया है। रिटेल शॉप में use होने वाले अलग अलग POS है जैसे cash register, card reader, bar-code scanner etc. POS invoice को single या multiple payment modes में रिकॉर्ड किया जा सकता है। टैली प्राइम में POS को प्रिन्ट कर सकते हैं। रिपोर्ट में POS के लेनदेन की list देख सकते हैं। टैली प्राइम में configure में POS को activate करना होता है। Point of sale के advantage - Sale को calculate करने में मदद मिलती है। Cash को manage करने में मदद मिलती है। Inventory को manage करने में मदद मिलती है। Bar-code scan करने में मदद मिलती है। Inventory और sales database की query को लचीला और सरल तरीका प्रदान करने में मदद मिलती है। Product movement को track करने में मदद मिलती है। Sale date और time को track करने और rec

GST Registration guide - GST registration on GST portal in Hindi


GST Registration guide

GST Registration guide - GST registration on GST portal post में GST Registration के बारे में बताया है। 

GST portal पर GST registration के steps की detail बतायी गयी है।

GST Registration on GST Portal -

gst.gov.in site को open करेंगे। Services > Registration > New Registration

GST Registration guide - GST registration on GST portal in Hindi

New registration पर click करेंगे। एक form open होगा।

GST Registration guide - GST registration on GST portal in Hindi

Form को fill करेंगे। भरने के बाद proceed पर clickकरेंगे।
Proceed पर click करते ही form में जो e-mail id और mobile no. है उस पर OTP  आएगा। OTP only 10 min. के लिए ही valid रहता है।

GST Registration guide - GST registration on GST portal in Hindi
पहले box में mobile OTP और दूसरे box में e-mail OTP fill करेंगे। अब proceed पर click करेंगे।
OTP verify होने के बाद notification screen open होगी। वहाँ 15 digit का temporary reference number (TRN) होगा। यह number e-mail और mobile पर भी आएगा इसको note कर लेना है।
इस TRN से GST portal पर my saved application से application को excess कर सकते हैं। यह TRN number 15 days तक valid होता है।
Proceed पर click करने पर new registration picture open होगी वहाँ temporary reference number TRN button पर पहले से ही tick होगा।
अगर आप अभी portal से बाहर आ जाते हैं और बाद में form fill करते हैं तो -
Services > registration > new registration click करने पर form open होगा but अब new registration पर नहीं temporary reference number TRN पर tick करना है।
First box में TRN number fill करना है। Second box में Captcha fill करना है। अब proceed पर click करेंगे।

GST Registration guide - GST registration on GST portal in Hindi

e-mail और mobile पर OTP आयेगा। OTP fill करके verify करेंगे।

GST Registration guide - GST registration on GST portal in Hindi

Proceed पर click करने पर एक form open होगा। उसमे सभी detail fill करेंगे।

GST Registration guide - GST registration on GST portal in Hindi

Top पर yellow color में Application type, Due date to complete, Last modified, and Profile completion percentage होगा।
Form के sections होंगे जिसको एक एक करके fill करना है। वह section हैं -

  • Business Details
  • Promoter / Partners
  • Authorized Signatory
  • Principal Place of Business
  • Additional Places of Business
  • Goods and Services
  • Bank Accounts
  • State Specific Information
  • Verification

Business Details -
Business details column पर click करने पर एक form open होगा।

GST Registration guide - GST registration on GST portal in Hindi
4 column auto-filled होंगे -
  1. The legal name of the business
  2. Pan no.
  3. Name of the state
  4. State jurisdiction
Column जो fill करने हैं वह हैं -
  • Trade name
  • Constitution of business
  • District
  • Sector - circle - ward - charge - unit
  • Centre jurisdiction
  • Are you applying for registration as a casual taxable person (अगर regular dealer हो तो NO select करे)
  • Option for composition (regular dealer हो तो NO selectकरे)
  • Reason to obtain registration
  • Date of commencement of business
  • Date on which liability to register arises
Last column -
GST Registration guide - GST registration on GST portal in Hindi
Page के end में save & continue पर click करेंगे
Next page open होगा

Promoter / Partners -

Personal information
  • Name of Person
  • Name of Father
  • Date of Birth
  • Mobile Number
  • E-mail Address
  • Gender
  • Telephone No. (with STD Code)
Identity information
  • Designation / Status
  • Director Identification Number
  • Are you a Citizen of India? (Yes / No)
  • Pan
  • Passport Number (Are you a citizen of India option में No select किया है तो passport number देना होगा अगर YES select किया है तो नहीं)
  • Aadhaar Number
Residential Address
  • Building No. / Flat No.
  • Floor No.
  • Name of the Premises / Building
  • Road / Street
  • City / Town / Locality / Village
  • Country
  • State
  • District
  • Pin Code
Document upload - Photograph

यहाँ 2 options हैं -
  • Upload a Photograph
  • Take a selfie photograph
Other Information
  • Also Authorized Signatory (Yes / No)
Select YES अगर proprietor ही authorized signatory है अगर proprietor authorized signatory नहीं है तो NO select करे।

GST Registration guide - GST registration on GST portal in Hindi
Page के end में save & continue पर click करेंगे।
Next page open होगा।

Authorized Signatory -
Promoter / Partners वाले page में also authorized signatory option में YES select किया है तो page open होगा वह इस प्रकार है -

GST Registration guide - GST registration on GST portal in Hindi
इस page में सभी boxes filled होंगे। Page के last में mention होगा कि proof of authorized signatory is not required. means authorized signatory के लिए कोई proof  की आवश्कता नहीं है।
Page के end में save & continue पर click करेंगे।
Promoter / Partners वाले page में also authorized signatory option में NO  select किया है तो page open होगा वह इस प्रकार है -

GST Registration guide - GST registration on GST portal in Hindi
Form fill करके document upload करने हैं।
Page के end में save & continue पर click करेंगे।
Next page open होगा।

Authorized Representative -
यह page GST practitioner के लिए है।

Do you have any authorized representative - NO select करे

GST Registration guide - GST registration on GST portal in Hindi
save & continue पर click करेंगे।

Do you have any authorized representative - YES select करने पर page open होगा -

GST Registration guide - GST registration on GST portal in Hindi
यहाँ 2 option हैं -
  1. GST Practitioner
  2. Other
option choose करने बाद form fill करें 
save & continue पर click करेंगे।
Next page open होगा।

Principal Place of Business -

GST Registration guide - GST registration on GST portal in Hindi
Fill करके save & continue पर click करेंगे।

Have an additional place of business में NO select किया है तो next page पर continue पर click करे

GST Registration guide - GST registration on GST portal in Hindi
Have an additional place of business में YES select किया है तो page open होगा वहां details fill करनी हैं।

GST Registration guide - GST registration on GST portal in Hindi
Next page open होगा। 

Goods and Services -
इसमें 2 option हैं -
  1. Goods
  2. Services
Goods select किया है तो goods commodities को by name or by HSN code से search हो।
Service select की है तो service commodities को by name or by HSN code से search कर सकते हो।

GST Registration guide - GST registration on GST portal in Hindi
save & continue पर click करेंगे।
Next page open होगा।

Bank accounts -

GST Registration guide - GST registration on GST portal in Hindi
Proof of details of bank account में BANK STATEMENT या CANCELLED CHEQUE upload करेंगे।
Fill करके save & continue पर click करेंगे।
Next page open होगा।

State-specific information -

GST Registration guide - GST registration on GST portal in Hindi
जरुरी जानकारी fill करके save & continue पर click करेंगे।
Next page open होगा।

Verification -

GST Registration guide - GST registration on GST portal in Hindi
check box पर tick करना है।
Name of authorized signatory में arrow click करने पर name list show होगी। Authorized signatory का नाम select करना है।
Place लिखना है।
Designation / Status - authorized signatory का नाम select करते ही यह column auto fill हो जायेगा।
Date - auto fill (current date)
Page के last में submit button के 3 options हैं। अगर form के mandatory fields fill किये हैं तो यह buttons activated होंगे नहीं।  तीनो में से किसी भी option को choose सकते हैं।
EVC option choose किया है तो OTP आएगा वह fill करके verify करना है।
एक बार form submit होने के बाद e-mail और mobile पर message आता है कि आपकी new registration application जमा हो गयी है। 15 digit का application reference number (ARN) number मिलता है।
ARN number को application status track करने के लिए use करते हैं।
gst.gov.in site पर जायेंगे 
services > registration > track application status

GST Registration guide - GST registration on GST portal in Hindi
ARN number और captcha code fill करने के बाद search पर click करेंगे।
search पर click करने पर result show होगा

GST Registration guide - GST registration on GST portal in Hindi
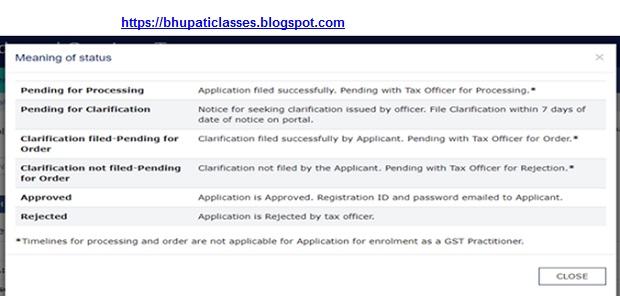
Status column में approved लिखा है तो form सही है थोड़े दिन में GST number with temporary password आ जायेगा।
Status column में approved के अलावा कुछ और points हो सकते हैं वह इस प्रकार हैं -

GST Registration guide - GST registration on GST portal in Hindi

Status column में अगर approved के अलावा कुछ और point है तो कारण बताओ notice होगा। Portal पर log in करके जिस point का clarification माँगा है वह देना होगा।

इस प्रकार online new GST registration के लिए apply कर सकते हैं और GSTN number प्राप्त कर सकते हैं।

यह पोस्ट भी देखें
Comments

Popular posts from this blog

Backup & Restore Company Data in TallyPrime

How to Create Stock Groups in Tally.ERP9 in Hindi

How to Create, Display & Alter Group in Tally.ERP9 in Hindi